
The Hobbit Interface is a game feature in The Hobbit: Kingdoms of Middle-earth.
Player Info[]
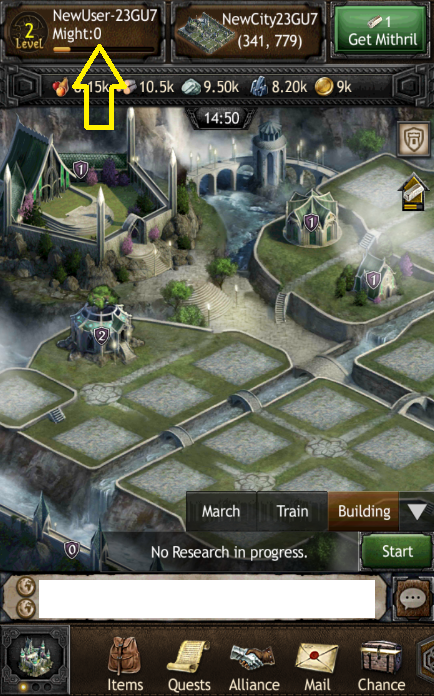
This area is reached by tapping on the button on the top-left of your screen which displays your current Level, Name, and how much Might you’ve accumulated. The top left of this section provides a House icon which takes you back to your City. On the top right, there are two separate icons, a Question Mark and a Gear.
The Question mark provides you with various help options including FAQs, the ability to force a refresh on your app if you are experiencing problems, a way to contact support, and a link to the forums here.
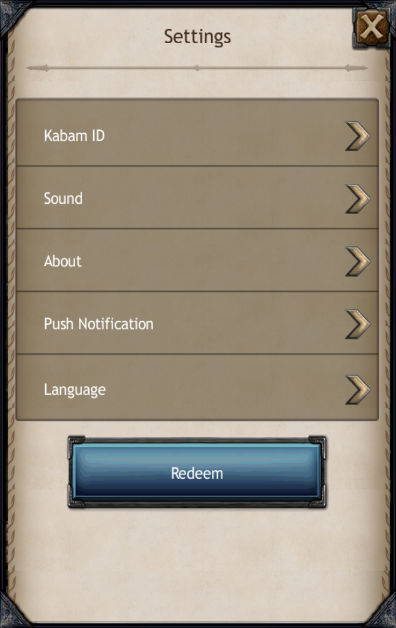
The Gear icon takes you to the Settings area where you can link your account to the game using your Kabam ID. Here you can also manage sound options, which push notifications you receive, as well as your desired language. By tapping on “About” you can view the Privacy Policy and Terms of Service that users of The Hobbit: Kingdoms of Middle-earth are supposed to abide by. The Redeem button allows you to enter a promotional code (if you have one) to receive additional bonuses.
There are three tabs associated with this area, they are: Details, Cities, Worlds
Details[]
This shows your current level and how much experience needed to reach the next level. Your faction, might, alliance position, and the name of the alliance that you are in are also displayed here. Near the bottom you are given an option to rename your character (Cost: 90 Mithril; Initial name change is free). Near the bottom of this area provides two additional buttons that allow you to report bugs and give you a direct link to the forums.

Cities[]
This section displays information about the city(ies) that you control. It lists the coordinates of each of your city as well as the name near the top. Your population for the city displayed in addition to the Food Supply and Happiness are displayed here. An option to change your city name is also available (Cost: 10 Mithril; initial city naming is free). Your additional cities can be displayed by tapping the “Arrow” icon to the right of your cities thumbnail image.

World[]
This section displays the worlds that are available to play on. Your current world will always appear at the top. Near each world is an option to either “Create” or “Return”. The create option appears if you do not currently have a city on that particular world.
The return option appears if you’ve already created a city on that world and want to “return” to it.

City Info[]
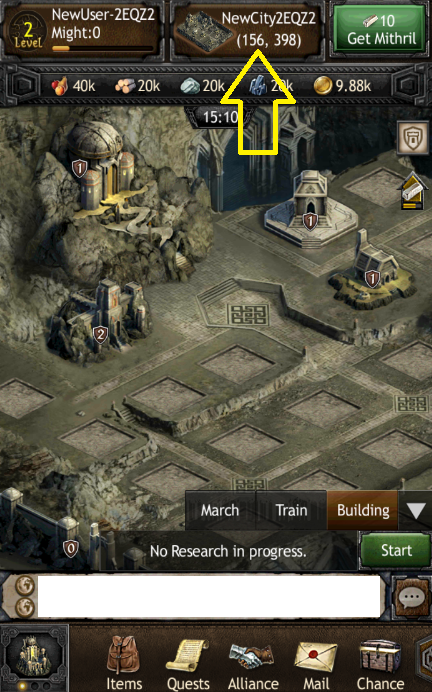
This area is reached by tapping on the button which displays the name of your city and your coordinates. This is located on the top-middle area of the game screen. When clicking on this button you are prompted with a window that allows you to choose one of your cities. When choosing a city from this list, you are able to switch focus between all of your cities without having to search for them on the world map. This allows you to easily manage your multiple cities. Currently there is only a 2nd city available.

Get Mithril[]
This area allows players to purchase mithril packages using real-world currency. The mithril provides the players with additional bonuses that are not as easily available to “free” customers. Anything you can purchase with Mithril can be obtained in-game without paying a dime, usually through the Gollum’s Riddle game. Another method for obtaining Mithril-based items can include: farming relics from Goblin Camps for the Second City Deed instead of spending mithril.


Resource Bar[]
The Resource bar is located directly under the top bar where the Player Info, City Info, and Get Mithril buttons are located. This section drops down when tapped on to display all of the information regarding your resources. Here you will see the current amounts of each of your resources: Food, Wood, Stone, Ore, and Gold. The maximum capacity for each resource is displayed in addition to the upkeep (Food and Gold only).
This area does NOT display base resource production values. You must tap on your Keep and tap the “Overview” tab then the “Production” tab. There you can view specific information for each resource by tapping on the arrow next to them, rather than a collective production value.
Displayed within this resource bar are also Population, Idle Population, Population Limit, Happiness, Tax, and Protection Limit. Your protection limit is how many resources that are protected by your Vault.
To the right of each resource is a button you can tap that is labeled “Boost”. This allows you to use various runes or other items that allow you to increase the production of that particular resource. (Bonuses show up just above the Boost button to indicate that you have an active boost, the percentage of the boost, and how long is left until it expires).


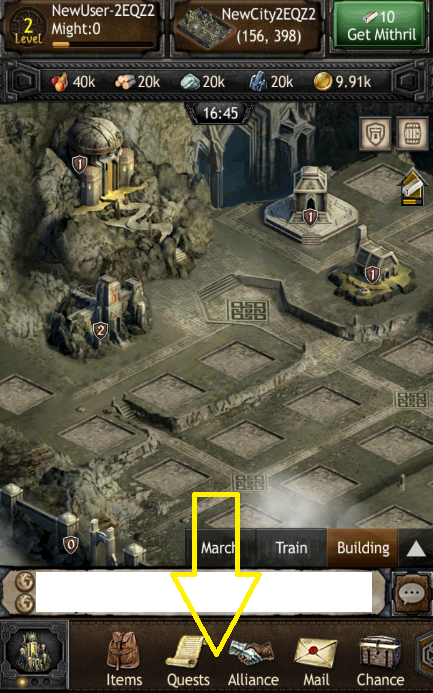
Task Interface[]
The task interface is located near the bottom of the Gameplay Window. It holds three tabs which contain the tasks in progress within your city. They are: March, Train, and Building.
March – Displays your current marching troops and their destination.
Train – Displays any troops or wall defenses you currently have in training.
Building – Displays any building constructions or research options you currently have going.
Beside each option will always be a “Speed Up” button. This allows you to use items to decrease the remaining time before the associated task finishes.
The little arrow to the right of the tabs allows you to expand/minimize these tasks.

Global Chat/Alliance Chat[]
By tapping on the bar where you can clearly see chat messages scrolling (or tapping on the message cloud on the right of the bar) will bring up the Chat interface for the game. Here you will see two separate tabs: Global and Alliance. Global chat allows you to speak with all players that are currently playing in the world you’re on. Alliance chat allows you to speak with only the members of your alliance. When viewing chat, a timestamp will appear next to the messages of other players. This indicates when the message was received and displayed by the game server.
Keep in mind when chatting to adhere to the specific rules of the Terms of Service which clearly state: Please respect all players. No profanity, hate speech, spam, or links. By not following these specific rules, you are putting yourself in the position to be reported by other players which can result in a temporary or permanent ban from the game, depending on severity and how many complaints are received against you.


City/Field/World Button[]
This button is located on the very bottom left of the game screen. This button allows you to switch between inside of your city walls, your resource field, and the World map. There are three separate “dots” which are located under the icon and “light up” depending on which screen you are viewing. The first one is your city within your city walls, second is your resource field, third is the world map.
When viewing the City or Field maps, you are faced with your free spaces (or constructed building spaces) that are available for you. Just under your Resource bar, there is a Clock which displays the current game time in 24 hour military format (Server time – The current time where the server is located). On the far right side, next to the game time, are buttons that display your active buffs (your used item bonuses) as well as Promotional events going on within the game.
On the far left side, next to the game time, a button will appear with a number next to it if you have a Watch Tower built and are expecting incoming attacks. The number symbolizes the number of marches incoming against you. You can tap this button and it acts as a shortcut to your “Incoming Attacks” tab located within your Watch Tower. Often a game announcement will block this area when you first login. Tapping on the announcement and then closing it will reveal the missing information.
When viewing the world map, you are faced with a grid-style map displaying what is located around your city. These can be: other players, goblin camps, or resource production wilds. Other players are indicated by a thumbnail of their factions’ city (Dwarves look like a mountain of stone with a doorway, Elves look like a normal city). Goblin camps are designated with a Red Flag.
There are 5 types of Wilds that can be conquered. They are Grasslands, Lakes, Mountains, Hills, and Woods.
There are a few icons at the top of the World Map as well. There is a GPS icon which upon tapping focuses on the coordinates of your city that you have active. The book icon displays your bookmarks. Bookmarks are extremely helpful when trying to remember coordinates to a city, camp, or wild that you might want to farm. There are two text fields located just to the right of this that allows you to manually enter coordinates to focus on. The magnifying glass focuses the screen on whatever coordinates are entered into the X and Y text fields.
When tapping on a grid square on the World Map, you will receive a popup window indicating what that coordinate consists of. You will receive the Name, Might, Alliance Information, Alliance Diplomacy with them, and Coordinates with the options to Scout and Attack (Reinforce and Transport options instead of Scout and Attack if they are within the same alliance). On the top left is a book icon that resembles the top bookmark button; that is exactly what it is. This allows you to more easily bookmark a location. In the case of player cities, an additional icon will show up on the top right of that window. This allows you to send a mail to the owner of the city.
By tapping with 2 fingers on the map, you can show/hide the level of each Wild and Goblin camp.


Shortcut Icons[]
The shortcut icons are displayed across the very bottom of the game screen. They are as follows:
Items[]
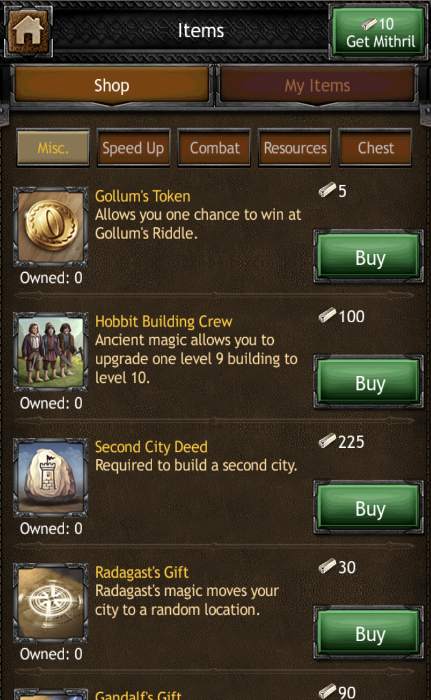
This area allows you to purchase items from the store by using Mithril. You can also view the items you currently have by tapping on the “My Items” section located within. The items are separated into different categories depending on what using them does, they are: Misc., Speed Up, Combat, Resources, Chest. These are pretty self-explanatory except for “Chest”. The Chest category holds the chests that you have been awarded by completing tasks or gaining levels (or purchased).
Quests[]
This section displays your active quests. This is where you will need to go to view what tasks you need to complete in order to finish the quest(s) and receive rewards from them.

Alliance[]
This displays information regarding your alliance. Here you can view all of the relative information to your alliance. There are four tabs associated with the Alliance section, they are: Info, Members, Alliances, Reports. Info provides basic information such as How many members the alliance has, their world ranking, how much might the alliance has combined between all members, your current position within the alliance, and the description of the Alliance. Higher positions in the alliance will also be able to allow other players into the alliance, kick them out, set diplomacy with other alliances, and view diplomacy with other alliances. There are two additional buttons located at the bottom of the Info tab that allows you to send a mail to everyone in the alliance or leave the alliance entirely. The “Members” tab allows you to view all of the members in your current alliance. This area is also categorized by “regular members” and “leaders”. The Alliances tab allows you to view all of the alliances that exist within your current world and their ranking. A search bar is available for you to find the alliance you are looking for if you have its name. The Reports tab provides information on any incoming/outgoing attacks/scout missions from or against anyone in your alliance. You can also filter whether you see the incoming or outgoing attacks.

Mail[]
This section allows you to view mail sent to you by other players, your alliance, or developer announcements. You can also view battle reports in the mailbox.
Chance[]
This is where you play the Gollum’s Chance game. Each day you are awarded 1 token to play the game with (each additional Tokens cost 5 mithril to play). After you choose to play, you are given a grid of 3x3 boxes that you are required to choose one from. Inside are random items (sometimes a very rare item is thrown in). You are awarded the contents of whatever chest you choose. Inside you can randomly find anything that can be bought in the store using mithril (aside from promotional items and chests). As shown in the right image, rare items do drop. If you look closely at the center box on the bottom row, it is a SECOND CITY DEED !


Train[]
This provides a shortcut button to your training queue in the Barracks.
Research[]
This provides a shortcut button to your Research Options within your Academy.
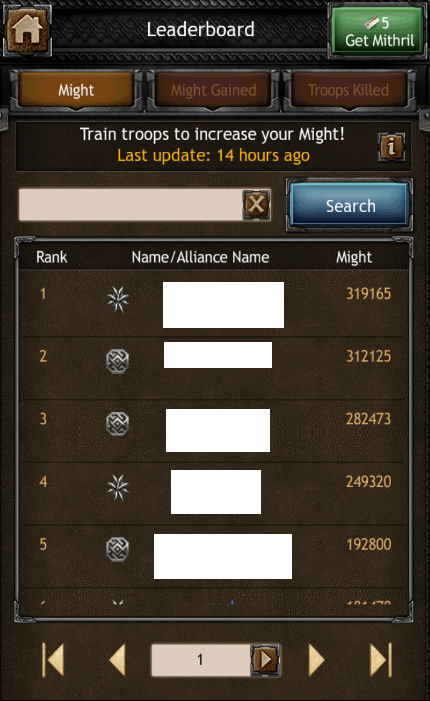
Rank[]
Here you can view the leaderboard rankings by player instead of by Alliance. (Player leaderboard is updated once every 24 hours). There are three different available rankings you can view, they are: Might, Might Gained, and Troops Killed. The Might leaderboard just ranks people associated with their current might. Might gained is a collective number of how much might they have acquired over a given period of time (All time, Current Week, Last Week). Troops killed specify how many enemy troops that specific player has killed (only other player troops are counted toward this, Goblin Camps or Wilds are not counted).
Settings[]
This provides a shortcut button to the game settings. The other way this can be reached is by tapping the button that houses your Player Name and clicking on the Gear icon located on the top-right. You can link your game to your KABAM ID from here to save your progress in case you lose, misplace, or break your device. You can also manage sound options, which push notifications you receive, as well as your desired language. By tapping on “About” you can view the Privacy Policy and Terms of Service that users of The Hobbit: Kingdoms of Middle-Earth are supposed to abide by. The Redeem button allows you to enter a promotional code (if you have one) to receive additional bonuses.
[]
This provides you the ability to connect the game with Facebook in order to invite friends or share the game on your Wall for others to see. There is also an email option that can be used to refer friends using their email address(es).
